Showing posts with label entertaining. Show all posts

Monday, July 5, 2010

As American as...Cupcakes?

Y'all ate up my last batch of cupcakes so I decided to share some more!  I made these for some friends yesterday just before watching certain film starring Will Smith and some aliens.  No, not Men in Black...that other one.  What's it called?  Oh yes, Independence Day! 

The 4th of July has always been one of my favorite holidays.  Playing by the pool, fireflies, watermelon...it just feels like summertime.  This recipe truly captures the pure, innocent joy of summertime.  It's fun and simple.  Also, it happens to be reduced fat/reduced sugar!  Be sure to bookmark this one for your barbecue next year...it's a big hit!

Liberty Cakes
Source: Inspired by fellow Foodbuzz Featured Publisher, Omnomicon

Ingredients:

1 box white cake mix
12 oz Sprite Zero (sorry...I live in Atlanta)
LOTS of gel food coloring
8 oz Fat Free whipped topping

Directions:

Preheat oven according to cake mix package directions.  Line cupcake pan.

Mix together white cake mix and Sprite Zero according to package directions.
Looks like cappuccino froth!

Pour one third of the batter into a small bowl.  Pour another one third into another small bowl.  Add blue food coloring to one bowl and red food coloring to the other.  I like to add three drops, stir, and repeat until I find the desired color.
The prettiest dirty dishes ever

Place one heaping tablespoon of blue batter into each cupcake liner.  Then place one heaping tablespoon of uncolored batter directly on top of the blue, as though forming concentric circles.  Then top each cupcake liner with one heaping tablespoon of red batter.  Repeat until you're out of liners (I made 2 dozen with this much batter).  Don't worry if your cupcakes look a little lower than usual...this stuff rises a lot!

Bake according to box directions.  Let cool completely.  Once cool, top with whipped topping and a blueberry.  Serve with sparklers and patriotism.

Wednesday, June 30, 2010

Pequeño Cheesecake

If you think I enjoy cooking, you should see me with a cake pan and a hand mixer.  I like to cook, but I love to bake!  This particular recipe has absolutely nothing to do with Cuban cuisine or my general gringa theme, but I just had to share!  My cousin introduced me to this Martha Stewart recipe (love her...both my cousin and Martha, that is) and it's been a big hit every time I've made it for friends!  I'm sure you'll have the same reaction.  Not only is it delicious, it's simply adorable.  Are they cupcakes?  Are they cheesecake?  Who cares!

Martha Stewart's Cookies and Cream Cheesecakes

Ingredients:

42 Oreos, 30 left whole, and 12 coarsely chopped (I put them in a gallon bag and released the aggression of studying for boards)
2 pounds cream cheese, softened (let them sit out for a while at room temperature, or zap them in the microwave for 30 seconds or so)
1 cup sugar
1 tsp vanilla extract
4 large eggs, room temperature, lightly beaten
1 cup sour cream
Pinch of salt

Directions:

Preheat oven to 275 degrees. Line standard muffin tins with paper liners. Place 1 whole cookie in the bottom of each lined cup.
Yes, I got a new camera,  Yes, it has a food setting.  You're welcome.

With an electric mixer on medium high speed, beat cream cheese until smooth, scraping down sides of bowl as needed. You might need to do this pretty often if you don't have a super high mixing bowl.  My mixing bowls are pretty short and Miss Corgi kept waiting for sweet creamy batter to go flying her way.
 Anticipating.

Gradually add sugar, and beat until combined. Beat in vanilla.

Drizzle in eggs, a bit at a time, beating to combine and scraping down the sides of the bowl as needed. Beat in sour cream and salt. Stir in chopped cookies by hand.

Divide batter evenly among cookie-lined cups, filling each almost to the top. Bake, rotating pan halfway through, until filling is set, about 22-25 minutes. Cool completely. Refrigerate overnight. Remove from tins just before serving.

 Look how cute!  (Source)

Saturday, June 5, 2010

Bailamos Mucho, Y'all

Oh blogging world, how I have missed you!  It's been a crazy month.  My group and I finished up our research study (which won an award, by the way), I graduated from physical therapy school, my fiancé graduated from law school, and finally, we spent a week in Costa Rica.  More on my culinary adventures in Costa Rica later.

The title for this blog post comes from a former professor of mine.  We were in Guatemala, and she was translating a Mayan woman's description of a traditional Mayan wedding.  After the marriage ceremony, the couple and all of their guests dance and drink and eat for hours upon hours.  Instead of saying that in Spanish, my professor just said "bailamos mucho, y'all!"  I'm pretty sure that sums up my last month.

I'm thrilled to be back into a normal routine, and I have a list a mile long of all of the things that I want to write about for you!  So without further ado, I present to you the return of Miss Gringa!  I'd like to kick things off with a refreshing summer beverage; something that truly captures the essence of the title of this post:

{Mojito}

Mojitos are a traditional Cuban highball.  You'll find these all over the Caribbean, but the actual birthplace is Cuba.  They've become quite trendy recently in posh cocktail bars in the States.  Unfortunately, most American places serve far from the authentic.  You'll see peppermint schnapps instead of mint leaves, Sprite instead of sparkling water, and worst of all, syrup instead of sugar cane.  I've found one authentic mojito before, and it was $14 in South Beach.  Here's a way to enjoy it, authentically and affordable, at home!

Ingredients:
 
1 teaspoon cane sugar
2 tablespoons lime juice (squeeze half of a lime and throw in the leftover wedges)
2 tablespoons Rose's sweetened lime juice
4 mint leaves
2 oz. white rum
2 oz. club soda
sugar cane
mint sprig
(Note: You can substitute 1 tablespoon of cane sugar and 4 tablespoons of lime juice for the first three ingredients.)

Directions:

Combine first six ingredients into a plastic pitcher.  Do not attempt this in a glass pitcher!

Muddle everything together.  A muddler is best for this, but if you're like us and registered for one but aren't getting married for a few months, a pestle from a mortar and pestle, a potato masher, or a mean pounder will do.

You want to make sure you squeeze everything you can out of those lime wedges and mint leaves.  The more flavor, the better!  The club soda may bubble a bit while you're doing this, but that's okay.  Just make sure you're not muddling so vigorously that your pitcher overflows.

Fill highball glasses with ice and pour.  Garnish with a stick of sugar cane (if available) and a sprig of mint.  Enjoy!

How cute are these?

Wednesday, March 31, 2010

Dave's Empanadas

First of all, I apologize for being MIA.  There are two big things coming up in my life right now: graduating from physical therapy school and our wedding.  Well, there have been some new developments with both of those events...I got a job and I found The Dress!  So, I've been pretty busy.  Happy, but busy.

Back to the matter at hand though...have I ever told you that my fiance makes The Best Empanadas in Atlanta?  Well, he does.  We've tried lots of other empanadas all over the city and his really are the best by far.  He, of course, is not a gringo so he is able to make them off the top of his head and add the perfect amounts of everything just by tasting it along the way.  My brain doesn't function that way.  I asked him to do his best to create a recipe out of what he does and here's what I got:

Ingredients:

Bear with me because this is a LONG shopping list
2 tablespoons canola oil
2 red peppers, chopped
2 medium yellow onions, chopped
2 tablespoons garlic, minced
2 pounds lean ground beef
4 Roma tomatoes
juice of 2 limes
1.5 tablespoons salt
2 tablespoons pepper
"a healthy dump of cumin" (not sure what that means...I'm guessing 3 tablespoons)
1 handful of raisins
1 handful of sliced almonds
20 discos (Goya sells them in packs of 10)
1 handful of grated sharp cheddar
1 egg, beaten

And finally...Dave's secret ingredient:
1.5 shots of tequila

Directions:

If discos are frozen, leave out for half an hour to thaw.  They should still be slightly frozen (you don't want them defrosted all the way to room temperature), but they need to be flexible enough to work with.  If they become too crumbly, use a little bit of water on your fingers to close any holes or tears.

Heat oil over medium-high heat in a large stock pot.  Add onions, red peppers, and garlic and cook until soft.  Add the ground beef and cook until brown.  Drain the fat and return pot to heat.

Add next ingredients, tomatoes through almonds, as well as the tequila.  Continue to cook uncovered at low heat for 2-3 minutes or until raisins have softened.

Once you have this nice mixture fully combined and cooked, spoon the filling onto the discos.
This part is difficult to quantify because it depends so much on the skill level of the cook.  I can get the disco to close with about 1 tablespoon of filling.  Dave can get it to close with at least 2.  Start small and try to put more filling in once you've developed your skill.  Top with a pinch of grated cheddar.

Next, fold the disco over the filling and close the edges with a fork, like so:

Place closed discos on a greased cookie sheet.  Preheat oven to 350˚.  Use a pastry brush to brush over each empanada with the beaten egg.

Next, stick those things in the oven.  They don't need to cook for that long (remember, your meat is already browned).  You're really just crisping the crust.  The important step in the cooking process is to make sure the empanadas cool appropriately.  Once you take them out of the oven, you need to let them sit for a while.  There is heat trapped inside the pastry, which means that 1) the inside will continue to cook even when out of the oven and 2) the steam trapped inside will make everything nice and moist.

Dave says to cook it at 350˚ "until golden brown" and to let cool "until you can't take the anticipation anymore."  I say cook for 20 minutes and let cool for 10.  Close enough.

Serve as appetizers or side dishes, but either way serve with salsa verde!

Wednesday, March 17, 2010

By Request: Tostones

Happy St. Patrick's Day, everyone!  I'm Irish (shocker, I know) so I will be making Alton Brown's Corned Beef and Cabbage later today, but last night I made tostones!

Tostones are a salty, savory plantain dish.  They're great as a side dish, or to serve with guacamole at parties.  I have mixed feelings about the results.  It was a successful failure...the Apollo 13 of Cuban cuisine, if you will.  I did learn a few valuable lessons, so I will share those with you.  I'll keep experimenting and let you know when I perfect my recipe!  Here's what I did:

All you need are 2 ripe green plantains, canola oil, and salt (and love, love is all you need...sorry, I had to).

First, you have to peel the plantains.  This is something I still struggle with, so I enlisted help.
Dave struggled too.

Valuable lesson #1: if you're experiencing difficulty peeling plantains, use a vegetable peeler (even better if it's ceramic).
Learning.

Next, cut the plantains into 1-inch thick slices.

Heat about 1/3 cup of canola oil in a large skillet over medium-high heat.  Place plantain slices in the pan.  The oil should just about cover the slices.  Valuable lesson #2: do NOT salt the plantains before cooking them.  Salt helps to break down the fruit during cooking and it will make the plantains softer.  This is a great texture for some dishes, but you want these babies crispy.

Cook about 3 minutes on each side.  Remove from pan and drain over a paper towel.

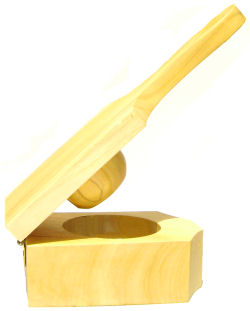
Next, you need to flatten the slices.  Real Cuban cooks use one of these:

This is called a tostonera, and if someone can help me figure out where to register for one I would be eternally grateful!  I McGyvered this up:

 Plastic bag + spatula + force

Place one slice at a time in a plastic bag.  Place spatula over bag and push down.  Valuable lesson #3: don't push too hard!  You want these to end up about 1/4" thick...no thinner!

  The good, the bad and the ugly

Once all of the slices are flattened, return the the hot oil and fry for another minute or two.  Drain on new paper towels, and enjoy!

 
This dish was made by request.  Do you have a Cuban dish you're dying to learn how to make?  Email me at cooking4gringas (at) gmail (dot) com!  Or become a fan on Facebook and post it on there!

Sunday, March 14, 2010

The Southern Belles' Midwest Invasion: Tres

What meal would be complete without dessert?  I've never made cheesecake before, and I have to admit I was a little intimidated with the water bath and whatnot.  You know what?  It turned out pretty darn good!

Chocolate Chunk Nutella Cheesecake
Source: adapted from La Fuji Mama

Crust:


Ingredients:
2/3 cup all-purpose flour
1/2 cup sugar
1/2 cup ground almonds
6 tablespoons (3/4 stick) butter, softened to room temperature
1/3 cup cocoa

Directions:

Preheat oven to 350 degrees.  In small mixing bowl, beat together ingredients until dough forms.  Press into springform pan.  Bake 12 minutes and cool completely.

Filling:

Ingredients:

3 8 oz. sticks of cream cheese, room temperature
1 cup sugar
3 large eggs
1 cup heavy cream
1 tablespoon lemon juice
1 tablespoon vanilla extract
1/2 cup Nutella
12 oz. semi-sweet chocolate chunks

Directions: 

Preheat oven to 350 degrees.  Begin to boil a large pot of water.

Combine cream cheese and sugar in a large bowl and beat until smooth.  Add eggs, one at a time, fully incorporating each before adding the next.  Make sure to scrape down the sides of the bowl with a spatula between each egg.

Add heavy cream, vanilla, lemon juice, and Nutella and blend until smooth and creamy.  Stir in the chocolate chunks.

Pour batter into prepared crust and tap the pan on the counter a few times to bring air bubbles to the surface.  Place pan into a larger pan and pour boiling water into the larger pan until halfway up the side of the cheesecake pan.  If cheesecake is not airtight, cover the bottom securely with foil before adding the water!

Bake 45 minutes, until it is almost done.  Look for the cake to hold together but not have a lot of jiggle to it!  Turn the heat off, with the cake in the oven, and let cool for about an hour.  Chill in the fridge for several hours (at least 4).

Well, there you have it!  What are your favorite dishes to make for dinner parties?

Saturday, March 13, 2010

The Southern Belles' Midwest Invasion: Dos

Our meal continues with the main course and side dish.  We figured chicken would be a safe way to go, but even midwesterners are accustomed to fried chicken.  Too obvious.  Given the yucky weather we'd been experiencing, we decided on a classic casserole and a warm veggie to accompany it.

Poppy Seed Chicken
Source: adapted from cooks.com

Ingredients:

8 skinless, boneless chicken breasts
2 16-oz. containers light sour cream (fat free will be too runny)
2 cans cream of chicken soup
2 cans cream of mushroom soup
2 sticks Ritz crackers, crushed
4 teaspoons poppy seeds
1/2 cup margarine, melted

Directions:

Boil chicken until thoroughly cooked.  Remove from water and cool.  Tear into bite-sized pieces (not completely shredded) and split between 2 casserole dishes.

Preheat oven to 350 degrees.  Mix 1 container of sour cream with 1 can of each soup.  Do the same in a separate bowl with the other sour cream and soup.  Pour one bowl over one casserole dish's chicken, and pour the other mixture over the other dish.  Cover each casserole with 1 stick of crushed crackers.  Sprinkle poppy seeds evenly on top.  Drizzle melted butter on top.

Bake about 25 minutes.  Yield: 16.

Mom's Green Beans
Source: Christina's mom

Ingredients:

2 pounds of trimmed green beans
4 strips of bacon (chopped in pieces)
1 medium yellow onion (chopped)
garlic powder
black pepper
1 can of chicken stock

Directions:
 
Fry bacon in pan on medium heat.  Add onion and cook until soft.  Add garlic powder and black pepper to seasoning.  Add chicken stock and then add green beans.  Put lid on and put on low heat.  Continue to cook until green beans become crisp and tender.

Tune in tomorrow for the third and final installment!

Friday, March 12, 2010

The Southern Belles' Midwest Invasion

I recently traveled to Kansas City with four friends.  One of us is from Kansas City originally, and her parents were kind enough to host us for several days.  To show our gratitude, we took care of dinner one night.  Our hosts were unfamiliar with Southern cuisine, so we decided to introduce some of our culture to the Midwest.
The girls hard at work

Though our meal was not in any way Latin, it was too good not to share!  Thus, I am pleased to announce a new column on this blog: Southern Comforts.

Any good dinner party begins with bread (that's what a dinner party is after all: breaking bread with friends).  What better bread to choose for a Southern dinner party than biscuits?  And sweet potato biscuits at that!  When served with honey butter, these quickbreads are always a huge hit.

Sweet Potato Biscuits
Source: adapted from Paula Deen
 Before

 After
Ingredients:

2-1/2 cups all-purpose flour
4 heaping tablespoons sugar
8 teaspoons baking powder
1 teaspoon salt
1-1/2 cups mashed cooked sweet potatoes (about 3 medium-sized potatoes)
1/2 cup (1 stick) softened margarine
2 tablespoons skim milk

Directions:

Preheat oven to 450 degrees.

Sift together dry ingredients.  In a separate, larger bowl, mix sweet potatoes and butter.  Add the dry mixture to the potato mixture and work to make a soft dough.  Add milk gradually.  Use two tablespoons to create 1-inch drop biscuits on greased cookie sheets.  Bake for 10-12 minutes or until the tops start to show a little brown.

Yield: 42 biscuits.  Number of biscuits left over for the trip back to Atlanta: 0.

Honey Butter
Source: adapted from Alton Brown

Ingredients:

1/2 pound softened butter (you just can't do margarine with this one...sorry fellow health freaks!)
2 tablespoons
1/4 teaspoon ground cinnamon
1/4 teaspoon vanilla extract

Directions:

Place the butter into a large bowl and beat at a low speed.  Use a spatula to keep scraping butter down off the sides of the bowl.  Increase the speed to medium and add remaining ingredients.  Beat well until combined, about 5 minutes.

If you have a cookie press, place half of the butter mixture into the press and use the star-shaped attachment.  This should make about 6 stars.  Repeat with remaining mixture.

If you do not have a cookie press, experiment!  You can shape the mixture into logs (like store bought butter) with parchment paper, or maybe form it into a thin sheet and use a cookie cutter to create fun shapes!

No matter what shape you turn your butter into, refrigerate for at least 2 hours to allow for it to harden.

Tune in tomorrow for more dishes from our fabulous dinner party!